You’ve poured your heart and soul into your website. The design is clean, the content is flowing, and you’re ready to start earning. You fill out the AdSense application, hit submit, and then… the dreaded email arrives.
“Sorry, your site does not meet our program criteria.”
No explanation. No specific feedback. Just a cold, automated rejection.Common issue users faces for adsense approval.
It’s frustrating, demoralizing, and incredibly common. The truth is, getting approved for Google AdSense in 2024 is harder than ever. Google isn’t just looking for a website; they’re looking for a high-quality, trustworthy online property that will provide a good experience for both users and advertisers.
But here’s the good news: getting approved is a predictable process. It’s not about luck. It’s about meticulously checking every box on Google’s hidden checklist.
After getting five diverse sites approved in the last year, I’ve reverse-engineered the process. This isn’t a list of the basic policies you’ve already read. This is a 10-step, actionable checklist to transform your site from “rejection” to “approved.”
Let’s get your site ready for its green light.
Pre Checklist: The Non Negotiable Foundation
Before we dive into the steps, your site must have these foundational elements. Without them, you will be rejected 100% of the time.
- You Own Your Content: Your site must have a substantial amount of original, written content. You cannot have scraped, copied, or auto-generated content.
- You Are 18+: You must be at least 18 years old to own an AdSense account.
- You Have a Working Website: Your site must be live, publicly accessible, and not behind a paywall or login.
If you have those three things, you’re ready. Let’s begin the real work.
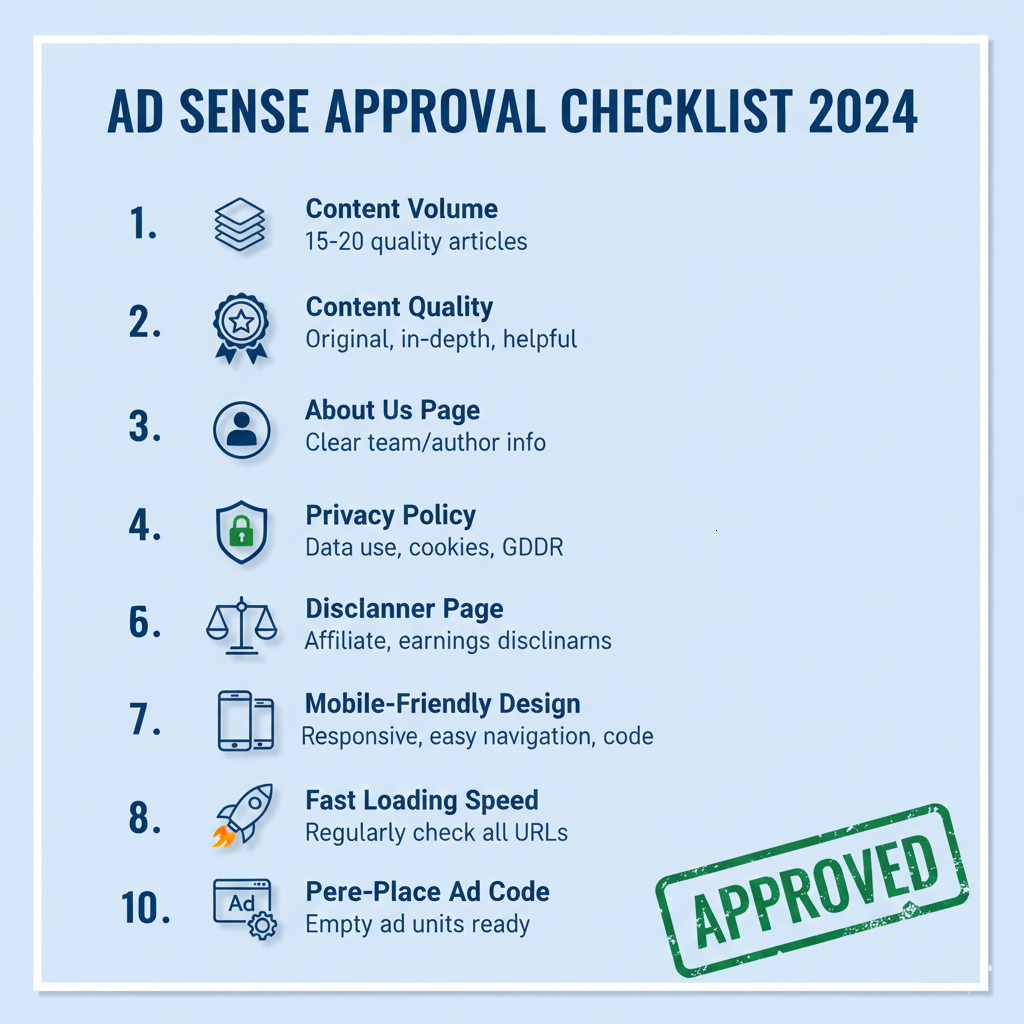
The 10 Step AdSense Approval Checklist
Step 1: The Content Volume & Quality Audit (The #1 Rejection Reason)
The Goal: Prove to Google that you are a serious publisher, not just someone trying to slap ads on a few pages.
- ✅ Have At Least 15-20 High-Quality Articles: While there’s no official minimum, applying with just 3-5 thin posts is a recipe for rejection. 15-20 substantial articles (300+ words each, with many being 1000+ words) shows commitment.
- ✅ Demonstrate Expertise & Authority: Your content should solve problems, answer questions, or provide unique insights. Write for humans, not just for search engines. Is your content better than what’s already in the top 10 Google results for that topic? It should be.
- ✅ Zero Grammar & Spelling Errors: Poorly written, sloppy content signals a low-quality site. Use a tool like Grammarly to proofread every single page.
The AdSense Reviewer’s Perspective: “Does this site provide real value? Would I personally bookmark it or return to it? Or does it look like it was created just to show ads?”
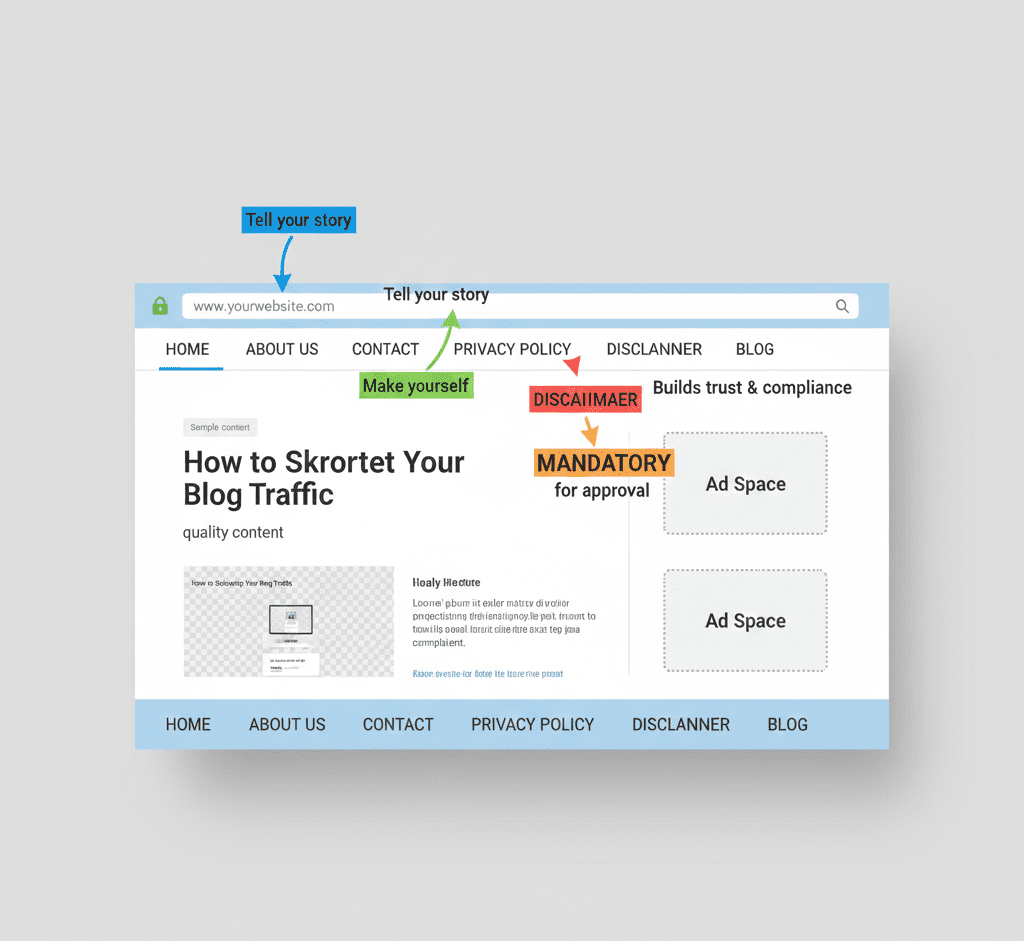
Step 2: The Critical “Must Have” Pages
Your website needs to look and function like a legitimate business or professional publication. This means having standard pages that build trust.
- ✅ A Comprehensive “About Us” Page: This isn’t just a one-line bio. Who are you? Why did you start this site? What is your mission? A good “About Us” page builds a connection with the user (and the AdSense reviewer).
- ✅ A Clear “Contact Us” Page: You must provide a way for users to get in touch. A contact form is the best option. Also include an email address. This shows transparency and accountability.
- ✅ A Detailed “Privacy Policy” Page: This is mandatory. You must have a privacy policy that discloses how you collect, use, and share user data. Since you’ll be using AdSense, it must also mention third-party vendors (like Google) and user consent for data collection. You can generate one using a reputable online generator.
- ✅ A “Disclaimer” Page (If Applicable): If you write reviews, give health/financial advice, or use affiliate links, a disclaimer is crucial to limit your liability.
Step 3: The User Experience (UX) & Navigation Test
Google wants to send its advertisers’ money to sites that offer a good user experience. A confusing or ugly site will be rejected.
- ✅ Clean, Professional Design: You don’t need a fancy, expensive theme. But you do need a clean, modern, and responsive (mobile-friendly) design. Avoid cluttered layouts, broken themes, and distracting colors.
- ✅ Intuitive Navigation: Can a first-time visitor easily find your main content categories and important pages? Your main menu should be simple and logical. A search bar is a huge plus.
- ✅ Zero Broken Links: Broken links (links that lead to a 404 error page) make your site look abandoned and unprofessional. Use a free tool like Screaming Frog SEO Spider or a WordPress plugin like Broken Link Checker to find and fix them.
Step 4: The Technical Setup Review
This is where many technically oriented site owners get tripped up.
- ✅ SSL Certificate Installed (HTTPS): Your site must be secure. The URL must start with
https://, nothttp://. This is a critical ranking factor and a basic trust signal. Most good hosting providers offer free SSL certificates (via Let’s Encrypt). - ✅ Easy-to-Remember Domain Name: Avoid free domain extensions like
.tkor.ml. Stick with common ones like.com,.net, or.org. A domain that matches your site’s topic is a bonus. - ✅ Fast Page Loading Speed: A slow site creates a poor user experience. Use Google PageSpeed Insights to check your speed. While you don’t need a perfect score, a significantly slow site (taking more than 3-4 seconds to load) can be a reason for rejection.
Step 5: The Pre Application “Ad Placement” Dry Run
This is a controversial but highly effective step.
- ✅ Place Ad Code Before Applying: Wait! Don’t activate the ads. Place the AdSense ad code on your site using a plugin or manually, but do not activate it in your AdSense account. Simply place the code where you plan to put ads (e.g., in the sidebar, within content). This shows the reviewer that your site is ready for ads and that they will display correctly and look natural. It proves you’re technically prepared.
Step 6: The Final Pre Submission Scan (The 24-Hour Checklist)
Before you hit the submit button, do this final run-through.
- Read Your Site Aloud: Does it sound like it was written by a human expert?
- Check on Mobile: Is the experience flawless on a phone?
- Click Every Link: Ensure nothing is broken.
- Verify “Must-Have” Pages: Are About, Contact, and Privacy Policy linked in your footer or main menu?
- Ensure No Placeholder Content: Remove any “lorem ipsum” or “coming soon” text.
What Happens After You Submit?
- The Waiting Game: Approval can take anywhere from a few hours to several weeks. Do not pester them with emails.
- If You Get Approved: Booyah! Celebrate, and then start learning about ad optimization (like our RPM guide).
- If You Get Rejected: Don’t despair. It’s not the end. Re-read this checklist. Often, the issue is a lack of substantial, original content or missing pages. Fix what you can, add 5-10 more high-quality articles, and wait 30 days before reapplying.
Conclusion: Approval is Your First Milestone
Getting AdSense approval is a rite of passage for online publishers. By treating it not as a random lottery but as a strategic checklist, you take control of the process.
Follow these 10 steps meticulously. Build a site you’re truly proud of—a site that provides genuine value to visitors. When you do that, AdSense approval becomes a natural byproduct of your hard work, not a distant dream.
Now, go audit your site. Your approval is waiting.
Frequently Asked Questions (FAQ)
Q1: How many articles do I really need for AdSense approval?
A: There’s no magic number, but based on widespread publisher experience, having 15-20 well-written, substantial articles (not 200-word thin posts) significantly increases your approval odds. Quality and depth trump sheer quantity.
Q2: Can I use a free WordPress.com or Blogger site?
A: Yes, but it’s harder. Google is more skeptical of free subdomains (yoursite.wordpress.com). Having your own custom domain (yoursite.com) looks far more professional and is highly recommended.
Q3: Why was I rejected for “Low Value Content”?
A: This is a catch-all term. It usually means your content is too thin, not original enough, poorly written, or doesn’t provide a good user experience. Compare your site to the top sites in your niche—does it hold up?
Q4: Should I buy traffic to get approved faster?
A: Absolutely not. Purchased traffic is often low-quality or bot traffic and will get your application rejected or your account banned permanently. Focus on building real, organic traffic slowly and sustainably.